This guide will instruct you to use Kerlink Wirnet iStation in Easy LoRaWAN Cloud.
- Product link: Kerlink Wirnet iStation
- Documentation: Data sheet and QuickStart Guide
- Manual: Kerlink WiKi


Step 1: To power on and connect your gateway into your network switch via LAN cable.
- The network switch MUST be able to access Internet.
Step 2: To download Advanced IP Scanner and Putty to your laptop/PC.
- Download links are in this guide.
Step 3: To obtain the IP of your gateway from Advanced IP Scanner.
- Your laptop with Advanced IP Scanner MUST be in the same network with the gateway.
- If the IP of your gateway is not found, then you may need to reset your gateway to factory defaults.
Step 4: To access the Web interface of your gateway
- URL: http://
- Username: admin
- Default password: pwd4admin
Step 5: [Important] In the Web Interface, to make sure the gateway use the required frequency plan (EU868, US915, AS923…)
- By default, your gateway should be already set to the correct frequency plan (US915, EU868, AS923…) by the manufacturer.
- Else, you may need to verify and configure the frequency plan to the desired plan here.
Step 6: To use Putty to SSH into your gateway
- SSH to your gateway’s IP
- Username: root
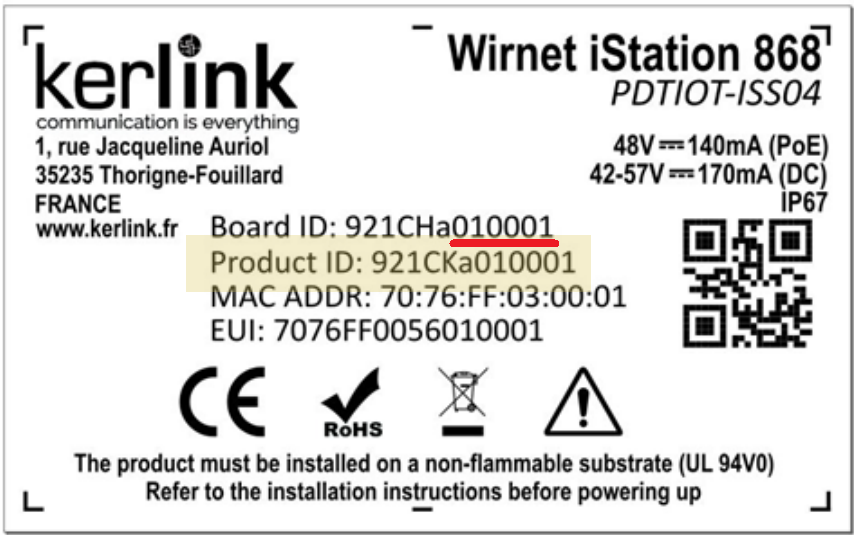
- Default password: pdmk-$serialno (Last 6 digits of board ID). For example: pdmk-010001
Step 7: In Putty, to get your gateway EUI
- grep EUI /tmp/board_info.json
- Example output: “EUI64”: “7076FFxxxx03028B”. Then you keep 7076FFxxxx03028B as Gateway EUI for later use.
Step 8: In Putty, to enable Kerlink CPF
- klk_apps_config –activate-cpf
Step 9: In Putty, to configure Kerlink CPF
- vim /etc/lorafwd.toml
under the [ gwmp ] section:
node = “lorawanserver.easylorawan.com”
service.uplink =
service.downlink = - The uplink and downlink port are 5700 for EU868. For other frequency plans, you can check the ports here.
Step 10: In Putty, to restart your gateway
- monit restart lorafwd
- Or you can unplug and plug back the gateway.
Next steps:
- You can continue with the Quickstart guides here
Done.
Advanced Configuration: Set frequency plan / region for the gateway
The steps are for Kerlink gateway with KerOS 4.3.3.
- For newwer KerOS, you may check here
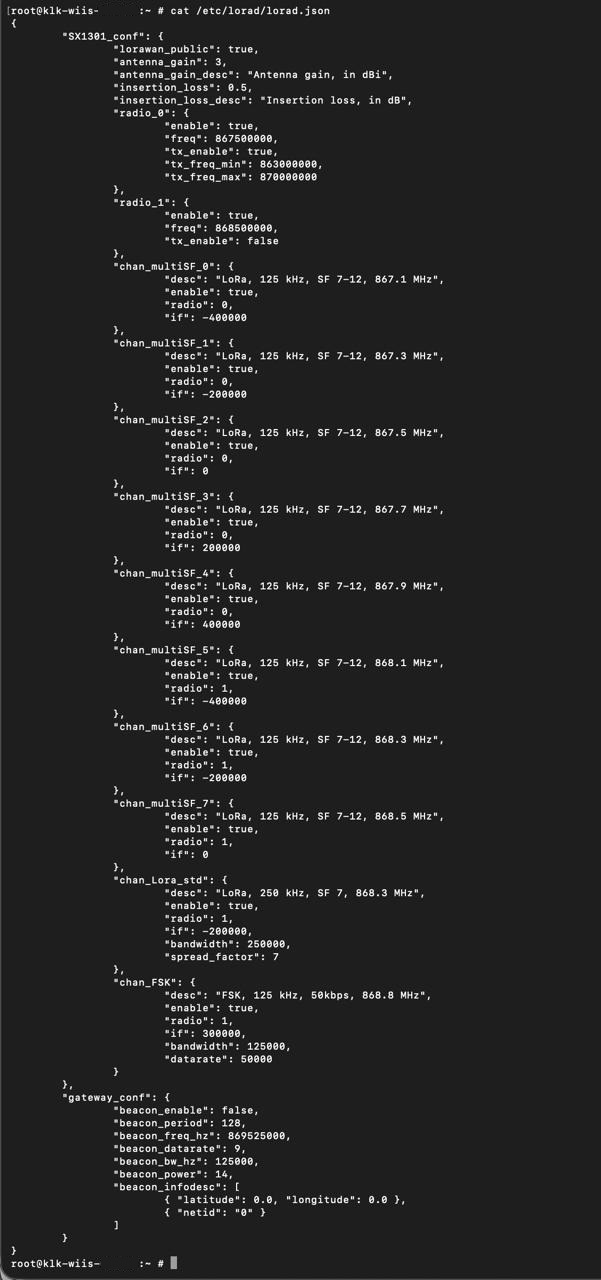
Step 1: Check the frequency setting in /etc/lorad/lorad.json
- SSH to the Kerlink
- cat /etc/lorad/lorad.json
This is a sample lorad.json for EU868.
Step 2: To backup the lorad.json
- cp /etc/lorad/lorad.json /etc/lorad/lorad.json.backup
Step 3: To edit /etc/lorad/lorad.json to fit your region
- The lorad.json files are HERE
- The frequencies must be in the required region here
- For additional regions, please contact us for support.
Step 4: Restart the LoRa daemon:
- systemctl restart lorad
- systemctl status lorad
Step 5: To check the logs to see if the lorad starts successfully
- tail -f /var/log/syslog | grep lorad
- journalctl -u lorad -n 50
Please contact us for additional support.
Need help for your projects?
Please chat with us on the red chatbox to get help or discuss about your projects.
Thanks for reaching us.


Hi IoTThinks,
I have a Kerlink iStation gateway.
Please help me to check the region and set the region to US915.
Hi Jose,
We have added the guide for you
Hope it help.
https://iotthinks.com/initial-setup-for-kerlink-wirnet-istation/#advanced-configuration-set-frequency-plan-region-for-the-gateway
Can I pay you for support?
I want to get my Kerlink working.
Sure.
You can pay for our support here.
https://iotthinks.com/professional-services/#techinical-support
I paid already.
Thanks a lot for your support.
It works now.
I found the Wiki for Kerlink here.
Hope it is useful for Kerlink users
https://wikikerlink.fr/wirnet-productline/doku.php?id=wiki:keros_custo:keros_applications_configuration
Yes, great.
Thanks a lot for sharing. 😀
Thanks for the guide.
The guide for Kerlink is quite rare in the Internet.
Yes, correct.
Hope it helps. 🙂
Just have the time to try.
Yes, the Kerlink gateway works now.
Thanks a lot.