This guide will instruct you to create a DIY 8-channel LoRaWAN gateway.
- The gateway is compatible with all LoRaWAN servers including ChirpStack LoRaWAN server and Easy LoRaWAN Cloud.
- The gateway supports 8-channel frequencies with web interface
- The gateway is open-source.


Step 1: To purchase supported Rasperry Pi boards and LoRaWAN Shields for Pi:
- To check All supported Pi boards and LoRaWAN Shields
- Raspberry Pi 4B and Raspberry Pi 3B / 3B+ are recommended. Raspberry Pi 5 is not officially supported.
- LoRaWAN Shields will be mentioned in the next steps.
- Of course, you need an antenna for your frequency too.
Step 2: The following LoRaWAN shields are recomended. Click on the links to go to the official stores.
- RAK2247: SX1301, SX1308 + SPI + option iPEX to RP-SMA Connector + Fiberglass Antenna + Pi Hat. This is entry option without GPS.
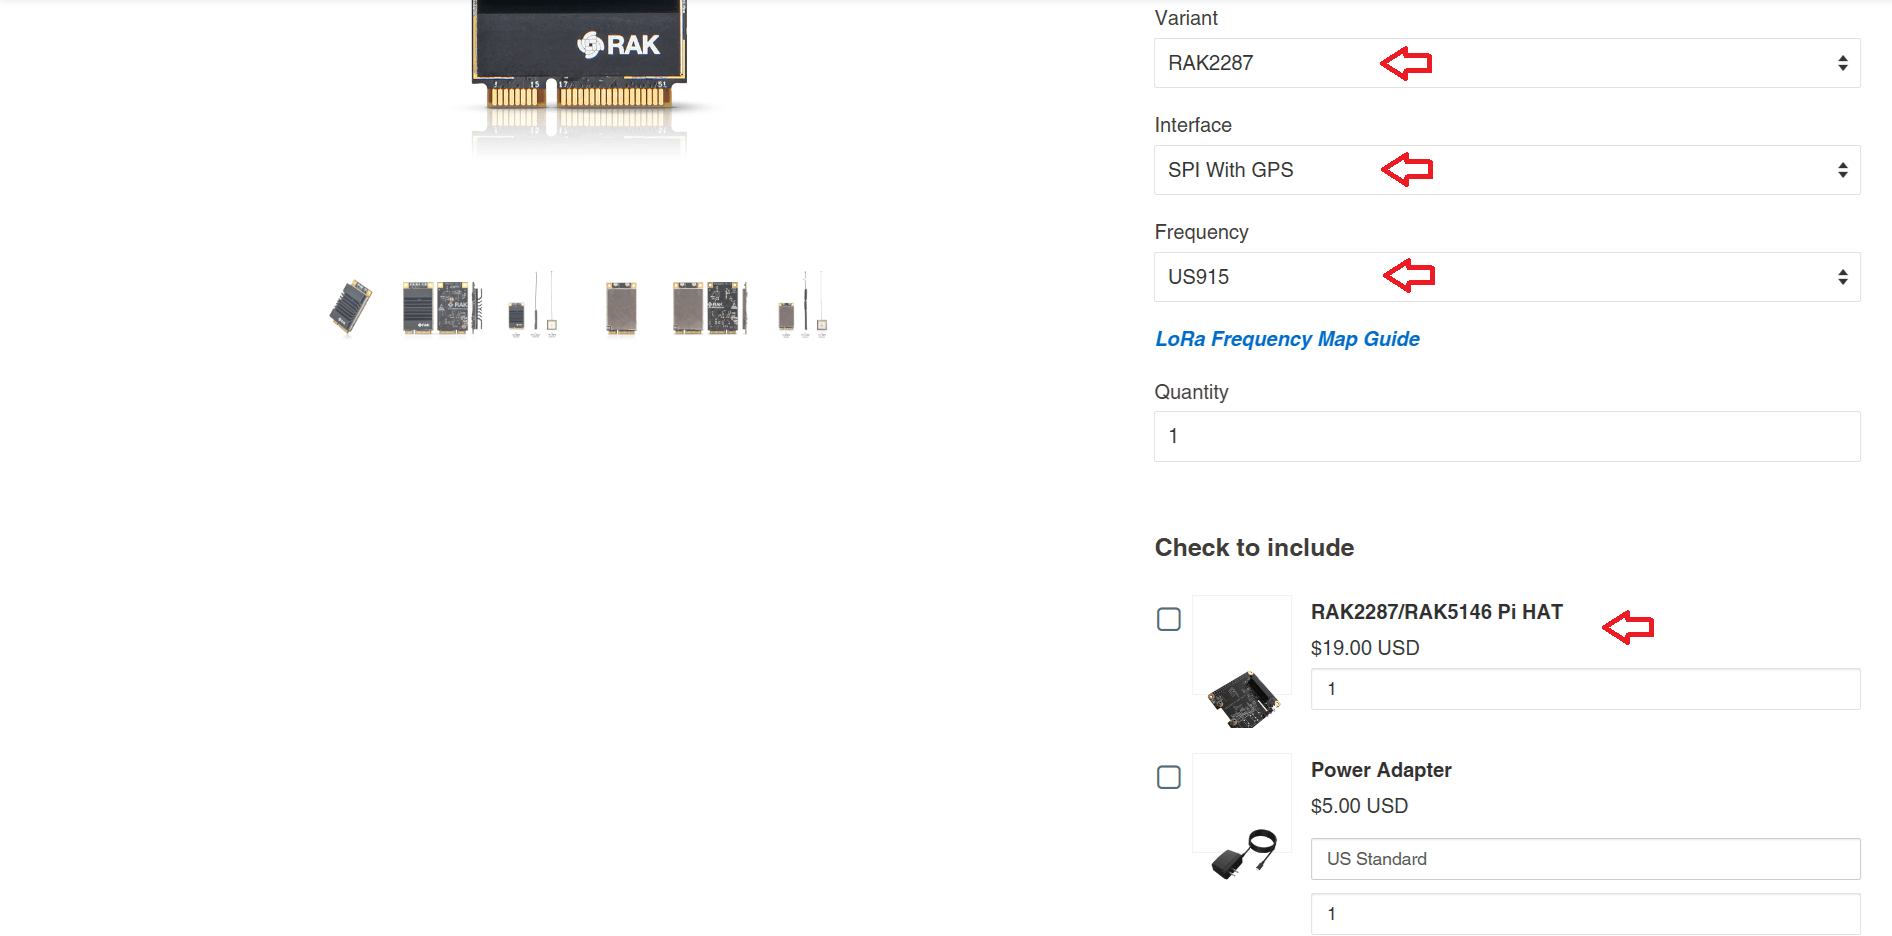
Product link: RAK2247. - RAK2287: SX1302 + SPI/USB + option GPS, Pi Hat. This is the most used option.
Product link: RAK2287. - RAK5146: SX1303 + SPI/USB + option LBT, GPS, Pi HAT. This is the latest version.
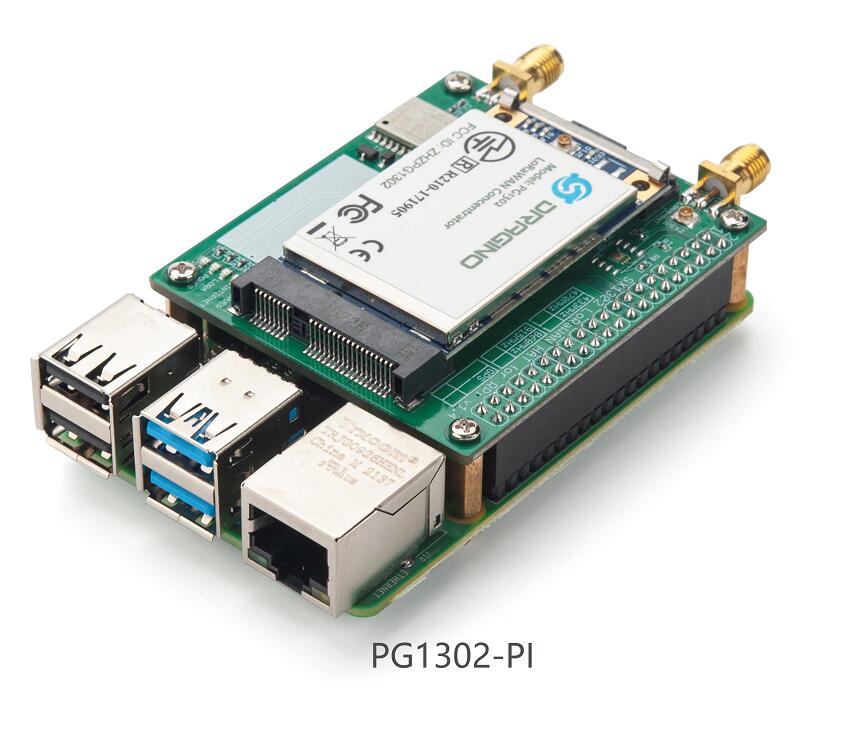
Product link: RAK5146. - Dragino PG1302: SX1302 + SPI + indoor antenna
- Seeed WM1302: SX1302 + SPI/USB + Option Pi HAT, antenna
Some notes to choose a LoRaWAN Shield:
- LoRaWAN version: SX1308 (Lowest tier – Cheapest) < SX1301 (Most used variant now) < SX1302 (Successor of SX1301) < SX1303 (Latest - Have Time Difference of Arrival).
- LoRaWAN interface: SPI with GPS is recommended. USB with GPS will work too. If no GPS, we can set the location manually.
- Frequency: You have to choose a frequency plan EU868, US915, AS923… according to your country.
- Pi Hat: You need to include a Pi Hat and an antenna
- Antenna: Fiberglass antenna will offer longer range in outdoor environment.
Step 3: To download the image
- (Recommended) To choose Base Image , if you want to connect the gateway to external LoRaWAN server or Easy LoRaWAN Cloud and you want to keep the data in long term. This is the best practice for production.
- To use Full Image, if you want to test a combo of LoRaWAN gateway and server. This image is for single-gateway setup and limited data capacity. This is for testing only.
The Base image provides a web-interface for configuring all ChirpStack components, network (Wi-Fi, ethernet, firewall, …) and system settings.

The ChirpStack Gateway OS Full image contains everything that is included with the Base image, but is also bundled with ChirpStack LoRaWAN Network Server and NodeRED:
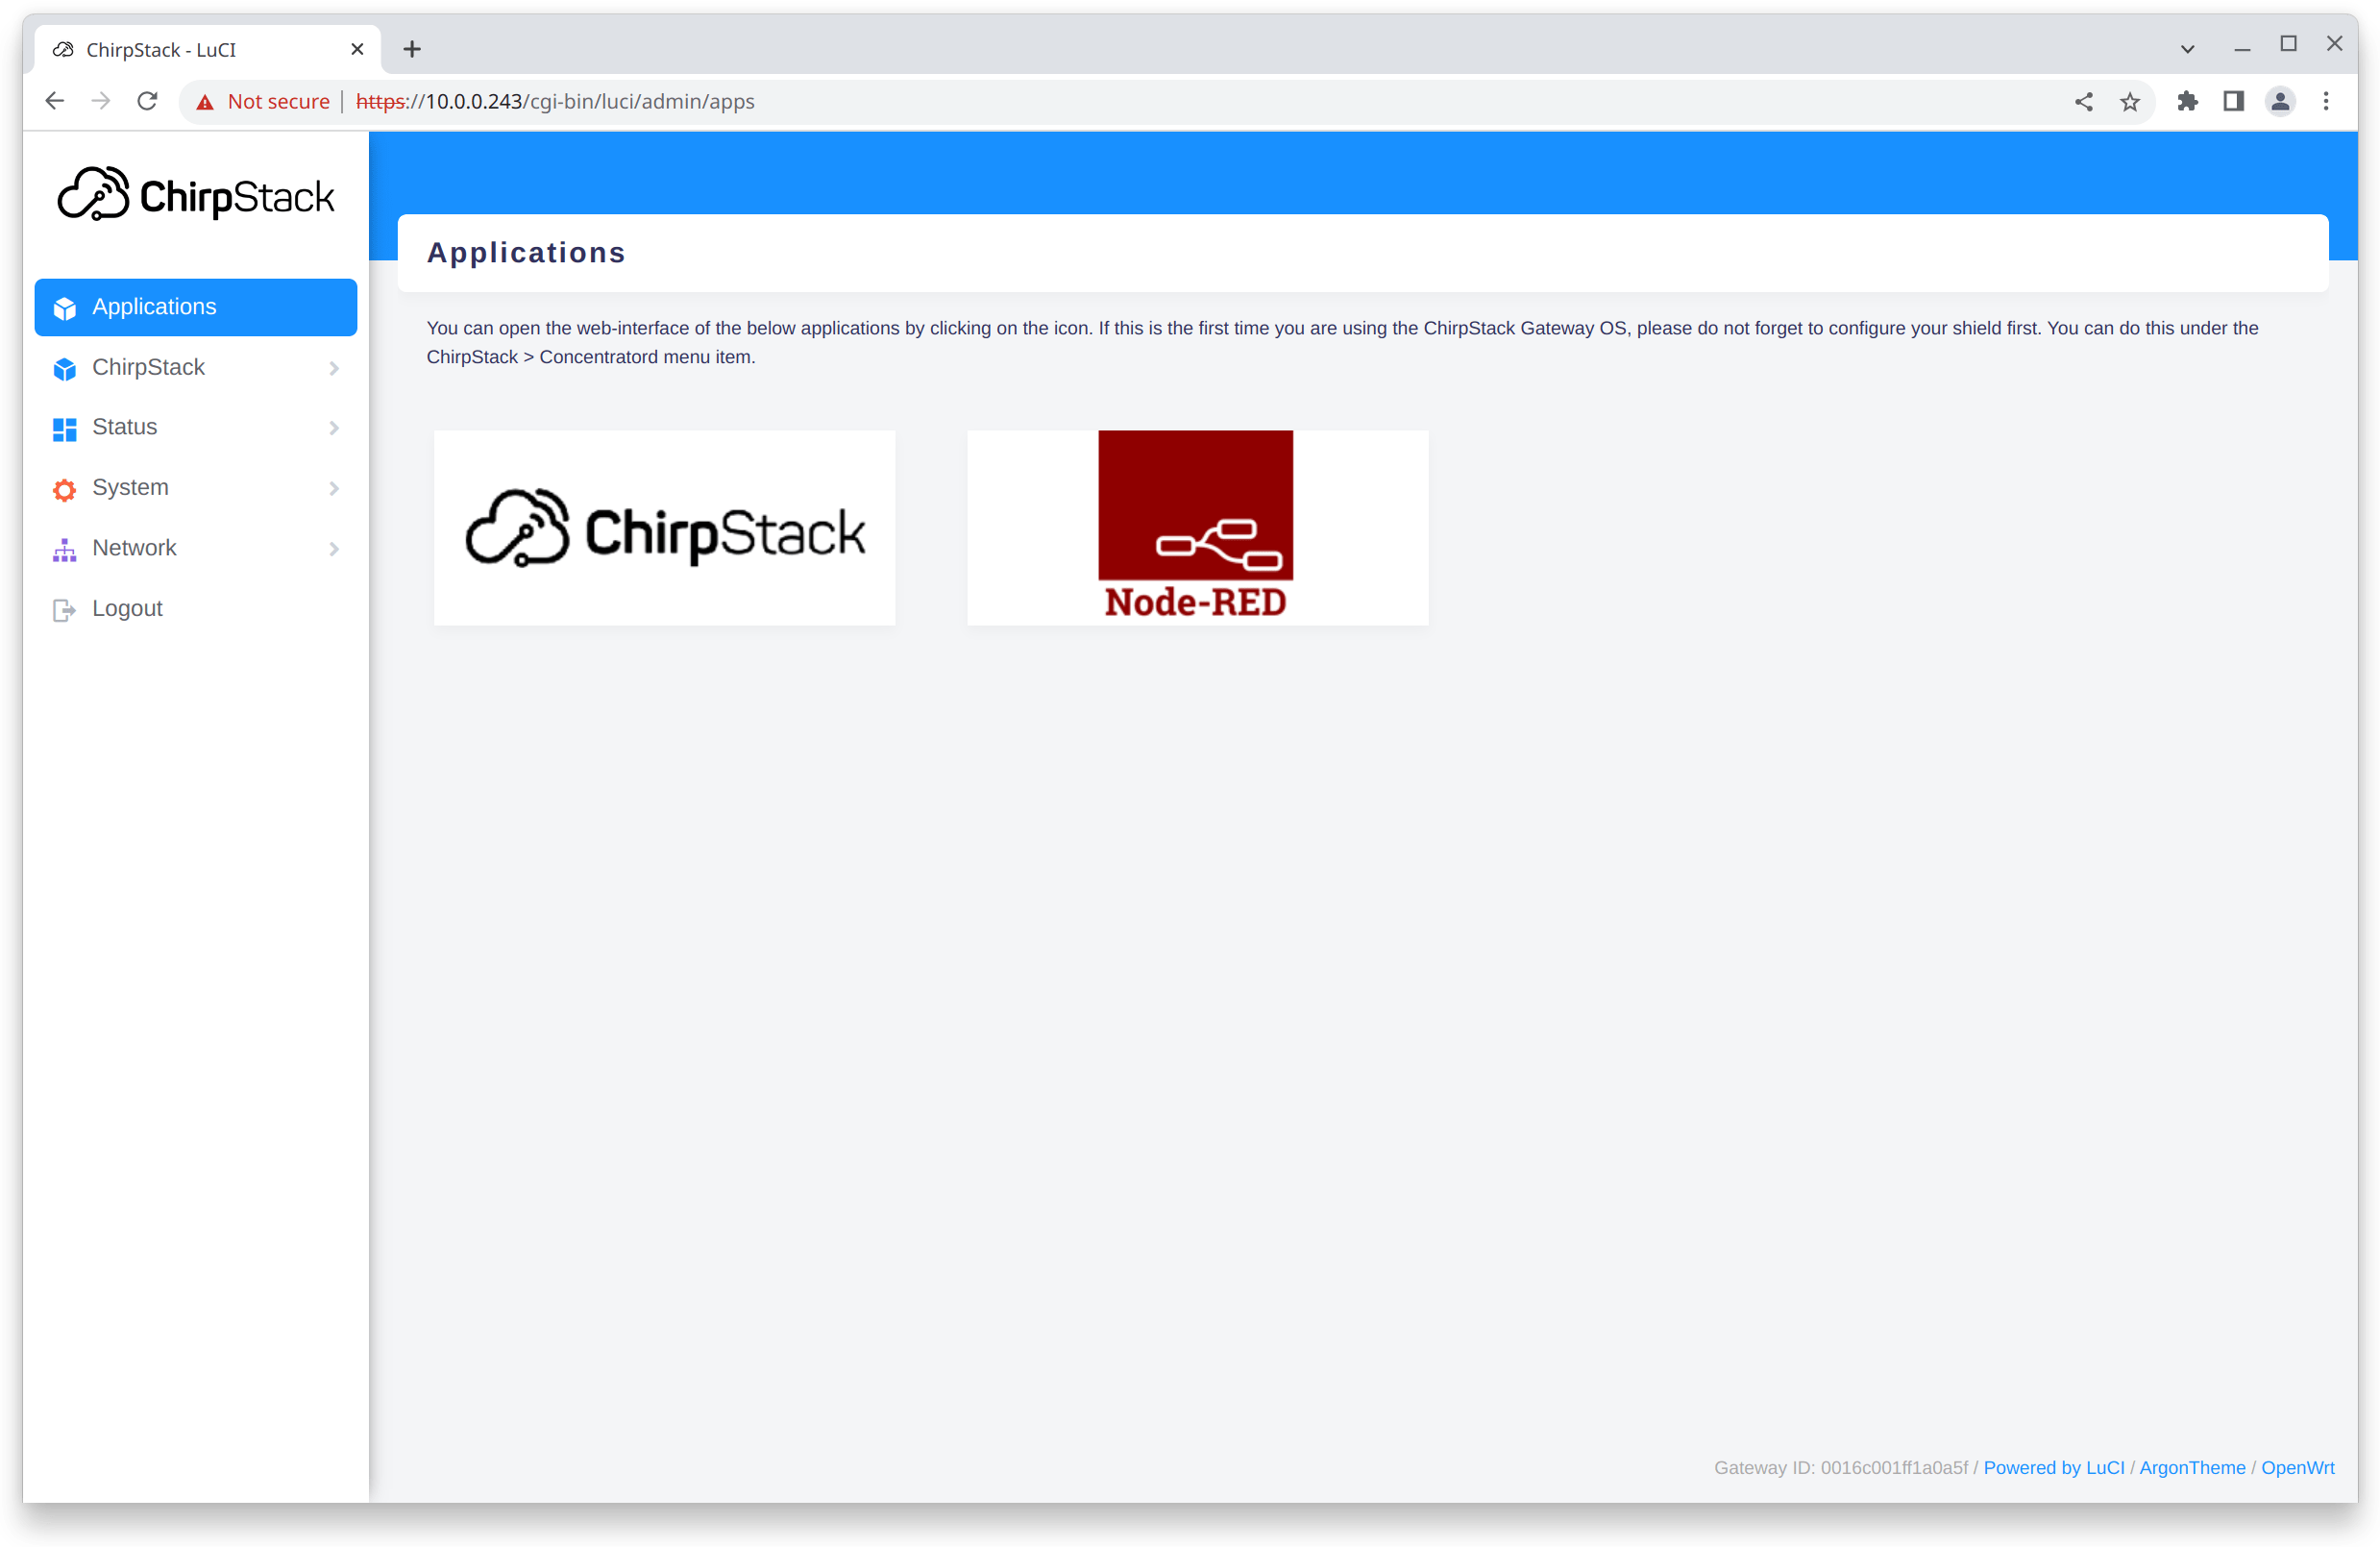
Step 4: Installation guide is available here
Step 5: User guides are available below:
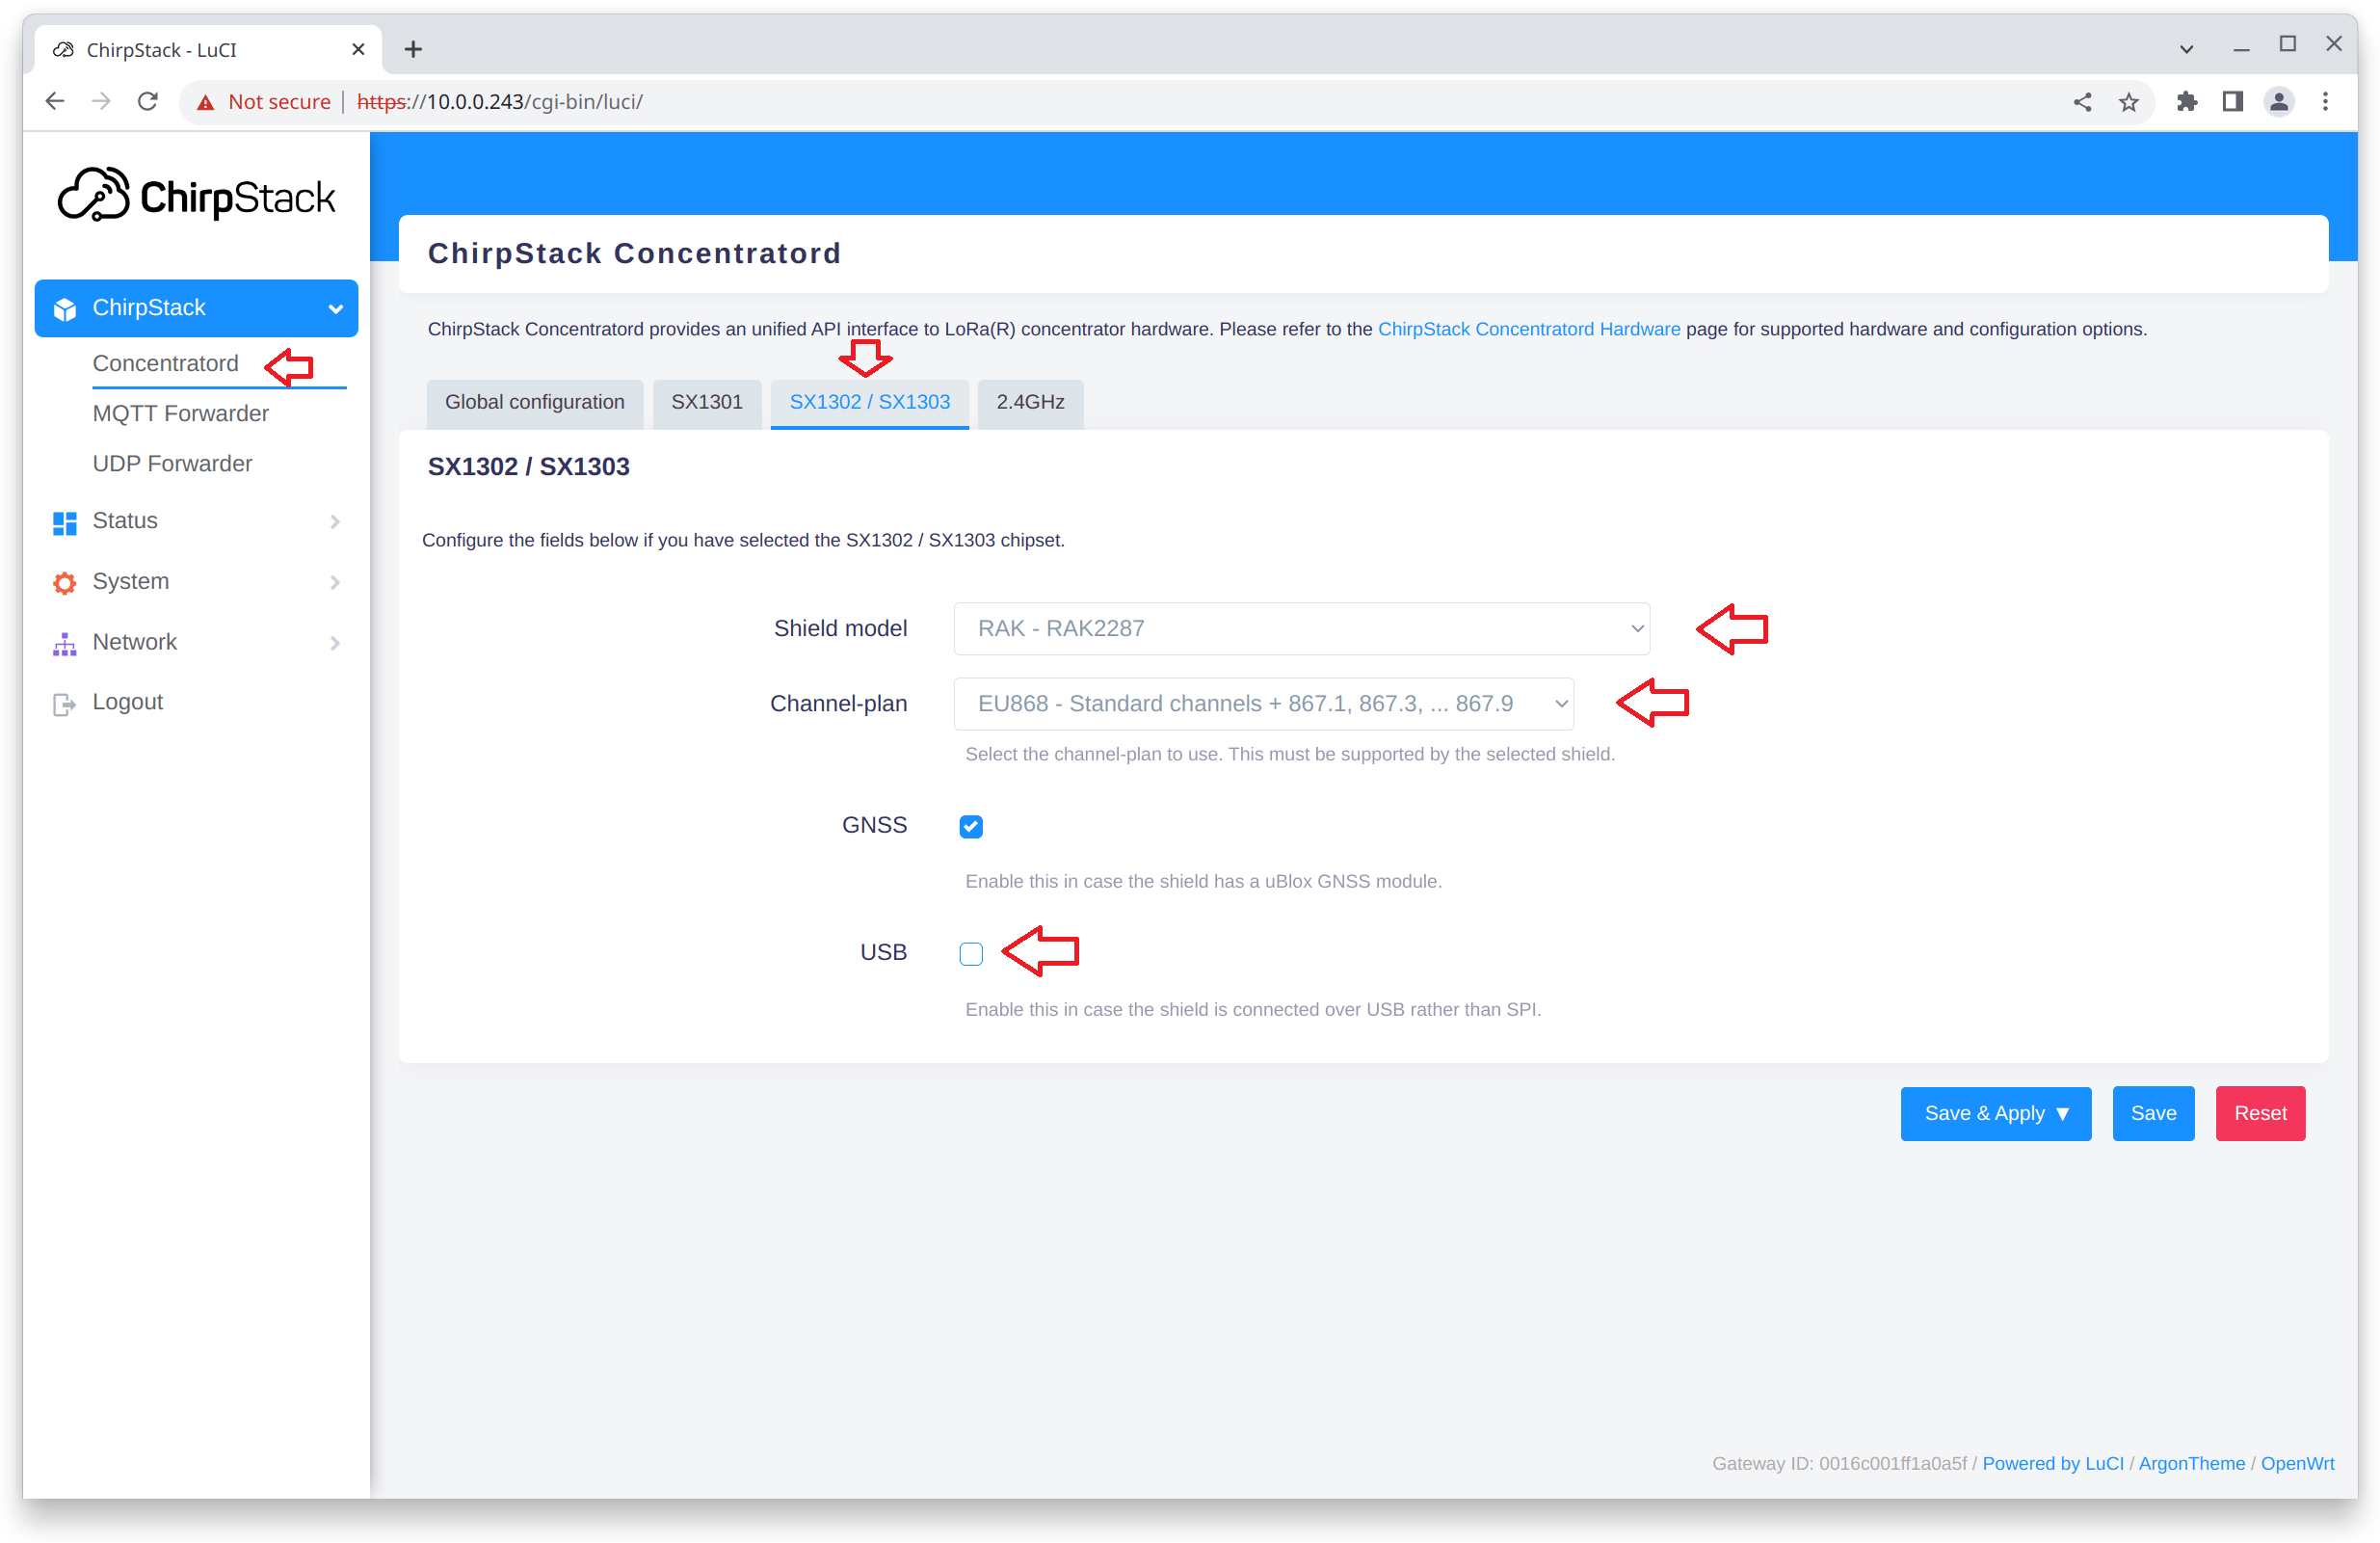
Step 6: To select shield model and frequency plan
Step 7: To connect to Easy LoRaWAN Cloud:
- To click ChirpStack and then UDP Forwarder in the left menu
- To set Server to lorawan.easylorawan.com:. The port for supported frequency plans is available here.
For other LoRaWAN server, you can use the below methods:
- Configure ChirpStack MQTT Forwarder (optional)
- Configure ChirpStack UDP Forwarder (optional)
- Using ChirpStack LoRaWAN Network Server
Done.
Next: Now you can continue to add your gateway to Easy LoRaWAN Cloud in the guides.
Need help for your projects?
Please chat with us on the red chatbox to get help or discuss about your projects.
Thanks for reaching us.


After creating a DIY LoRaWAN gateway and node, how could I test them?
You can register our Easy LoRaWAN Cloud to test.
Start at only 1 USD/month with mobile app.
https://iotthinks.com/easylorawan-cloud/
Ok, let me see it.
Please help me to on board my gateway and node.
Sure, you can chat with our engineer at the bottom right of the page.
Welcome on board.
Hello,
Thanks for the great guide.
I’m considering to buy a RAK shield for gateway.
Which one do you recommend?
Hi Francis,
It is up to your need and budget.
We bold the differences between shields below for your easier decision.
Hope it helps.
Does this gateway support gateway mesh?
Hi Leo,
We are testing the gateway mesh.
Once it is stable (within this year), we will publish a guide for it.
Please subscribe this topic so you will get alert once the guide is ready for you.
Ok. I have just scubscribed this topic.
Looking forward to the gateway mesh soon.
Thanks a lot.
Does this gateway work with Easy LoRaWAN Cloud?
I’m using AS923-3.
Which variant I should buy?
Hi Tom,
For AS923-1 (AS923), AS923-2 and AS923-3, you can buy the AS923 version.
Then in the configuration of the gateway, you can choose AS923-3.
The links to purchase the LoRaWAN shield for gateways are below in step 2.
Step 2: The following LoRaWAN shields are recomended. Click on the links to go to the official stores.
Where to buy the LoRaWAN shield for the gateway?
Is Rasberry Pi 5 supported.
You can click on the link in step 2 to buy the LoRaWAN shields.
Step 2: The following LoRaWAN shields are recomended. Click on the links to go to the official stores.
Pi5 is not supported yet.
You can try with Pi3 and Pi4.
Hope it helps.
Will this work with my local LoRaWAN server?
I want to create my own LoRaWAN gateway.
However, I have little knowledge to install a LoRaWAN server on my own.
Thank you.
Hi Jacob,
Yes, this DIY LoRaWAN gateway will work with all LoRaWAN Clouds and LoRaWAN servers in the market.
If you want to test the gateway, you may try with our Easy LoRaWAN Cloud first to understand the flow between LoRaWAN nodes, gateways and server.
The plans start at 1 USD/month only.
https://iotthinks.com/easylorawan-cloud/
Hi,
Do you have a guide to create a single channel LoRaWAN gateway?
Thanks a lot.
Hi Kevin,
We used to have a guide to create single channel LoRaWAN gateway.
However, we have stopped supporting single channel LoRaWAN gateway.
Single channel LoRaWAN gateways do not comply to LoRaWAN standard and are not allowed by major LoRaWAN Cloud (including our Easy LoRaWAN Cloud) and LoRaWAN servers.
You can consider to create a 8-channel LoRaWAN gateway in this guide.
Or you can consider to buy a commercial LoRaWAN gateway in this link: https://iotthinks.com/lorawan-gateways/
Thanks a lot and enjoy LoRaWAN.