This guide will help you to perform troubleshooting for LoRaWAN.
- The guide is applicable for most of LoRaWAN nodes and gateways with minor differences in configuration.
- The guide is also applicable for ChirpStack LoRaWAN Network Server v4. We assume all server components are setup correctly.
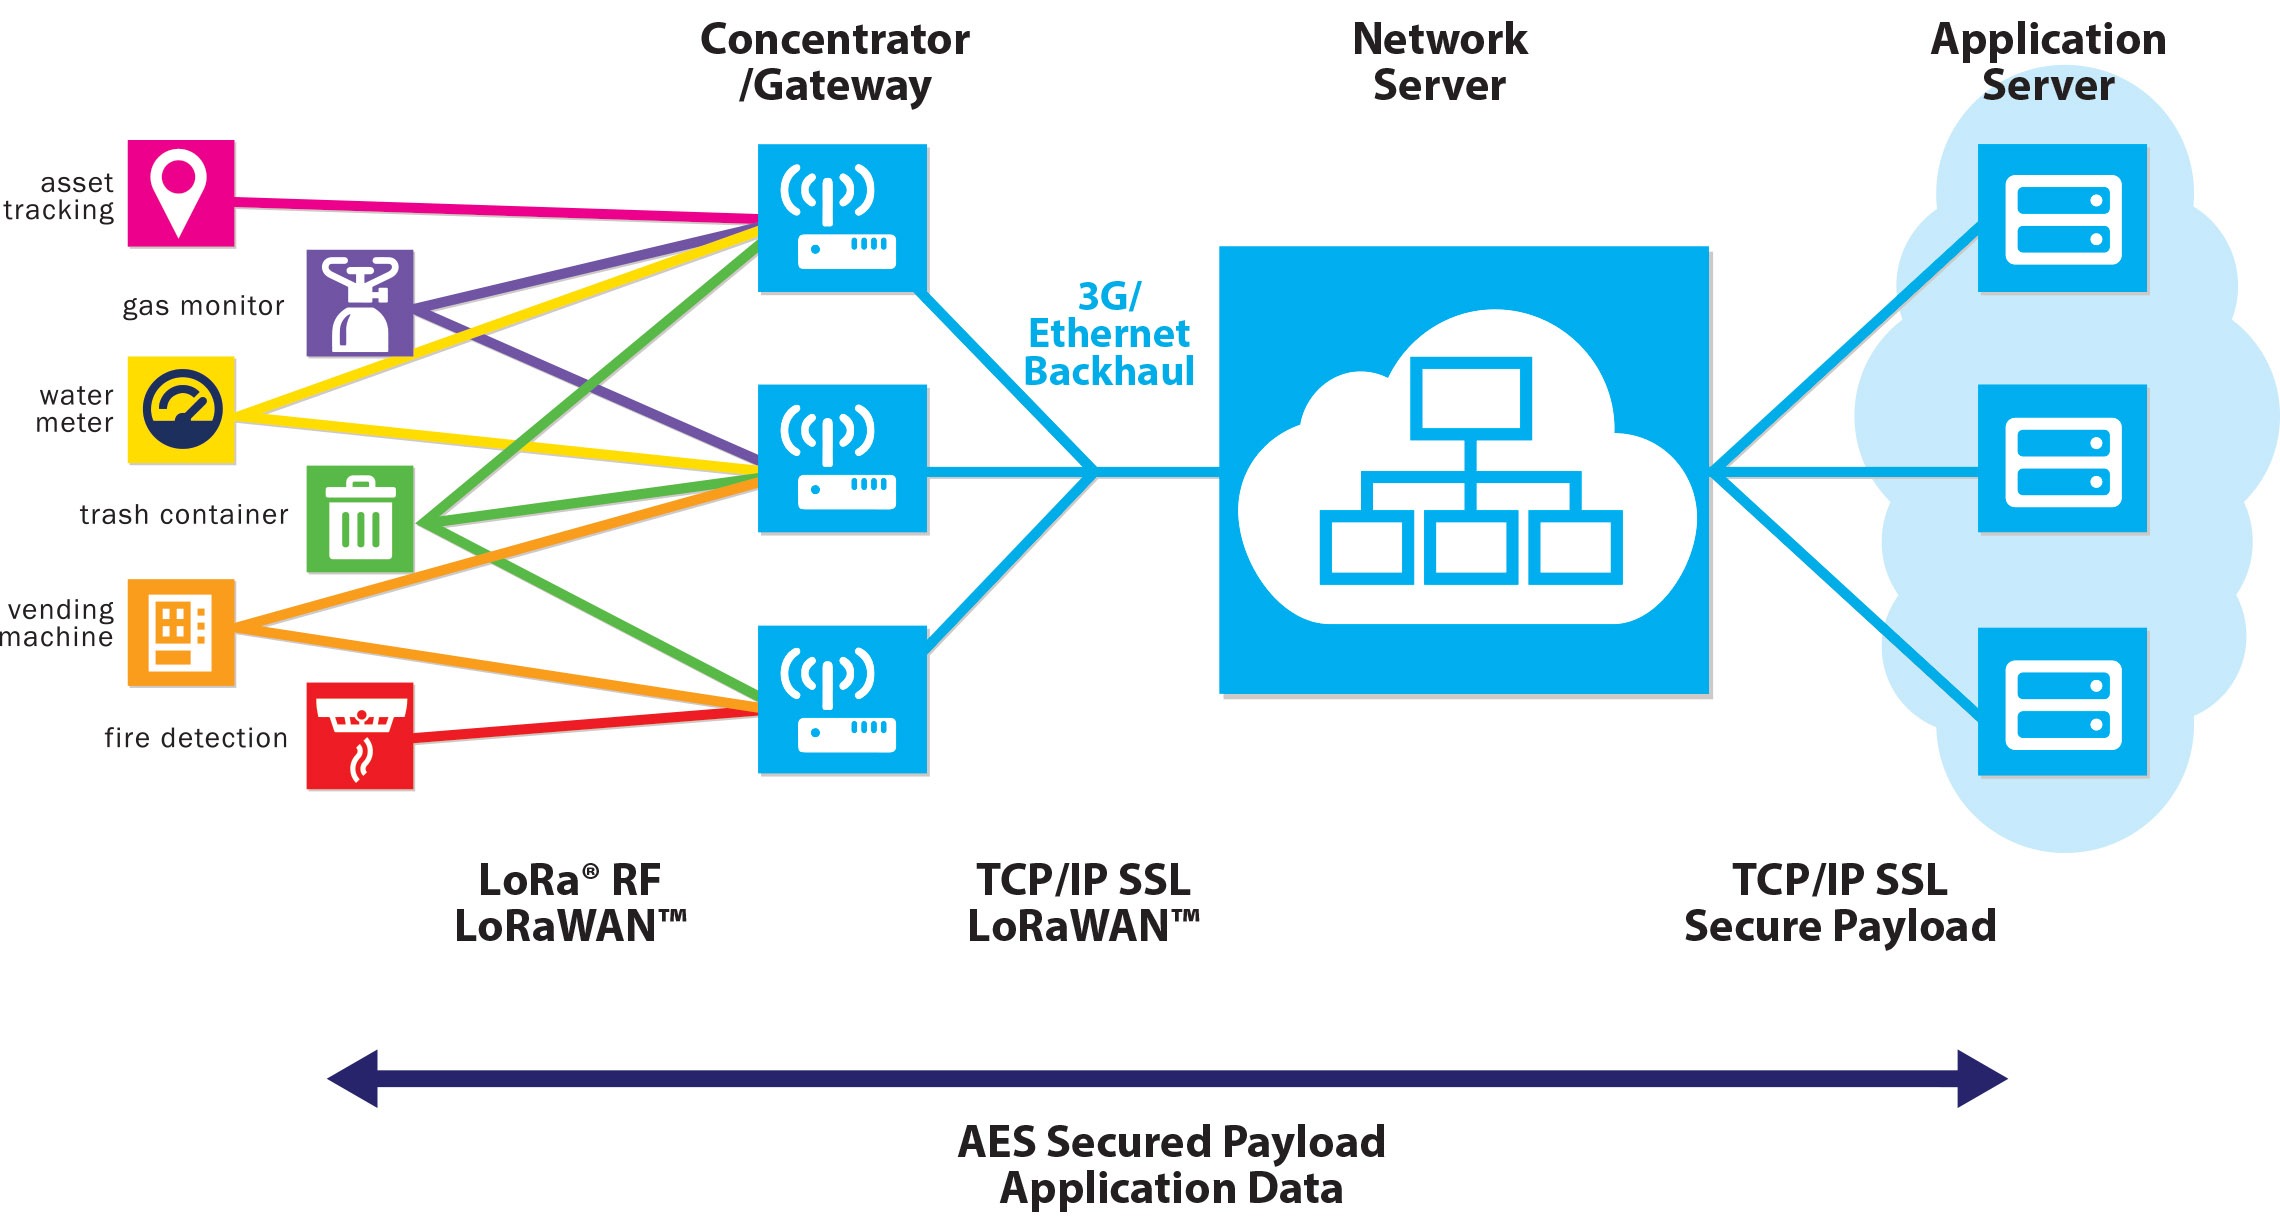
This is the overall diagram for LoRaWAN network: LoRaWAN node, gateway and server.
- The gateway must be able to connect to the server and use the same LoRaWAN frequencies.
- The node must be able to connect to the gateway using the same LoRaWAN frequencies.
- The node must have the same AppKey with the server.
1. Check LoRaWAN Gateway
Step 1: Make sure your gateway has Internet / network access to the LoRaWAN server.
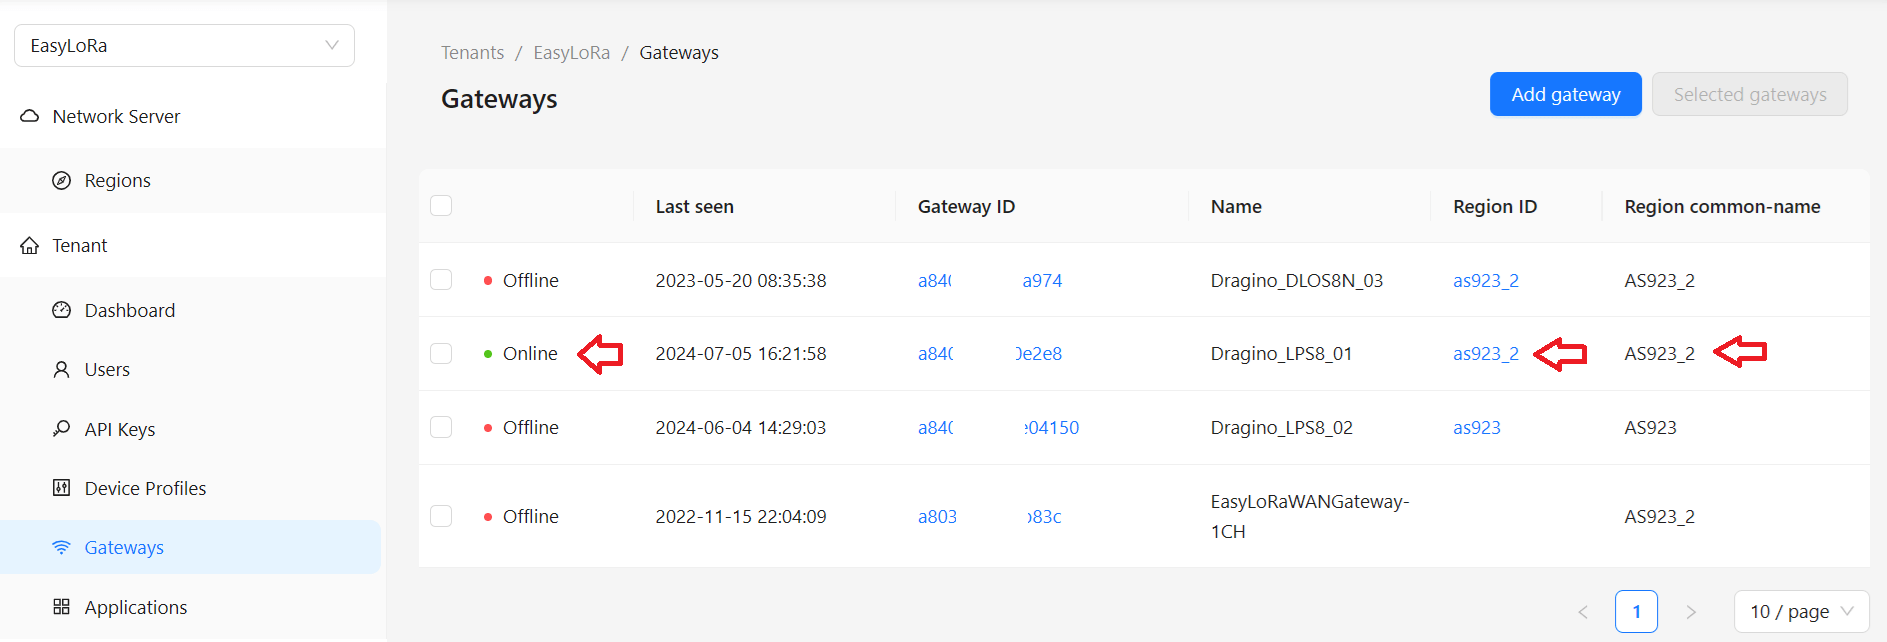
Step 2: Check if your gateway has the correct Gateway ID, correct Region ID, Region common-name and Online?
- If the status is Offline, to check if you have set the address and port for Semtech UDP Packet forwarder in your gateway correctly. You can check Initial Setup for Gateways to set the server address and port for Semtech UDP Packet Forwarder.
- If the Region ID and Region common-name are not shown correctly, you may use incorrect address and port for Semtech UDP Packet Forwarder.
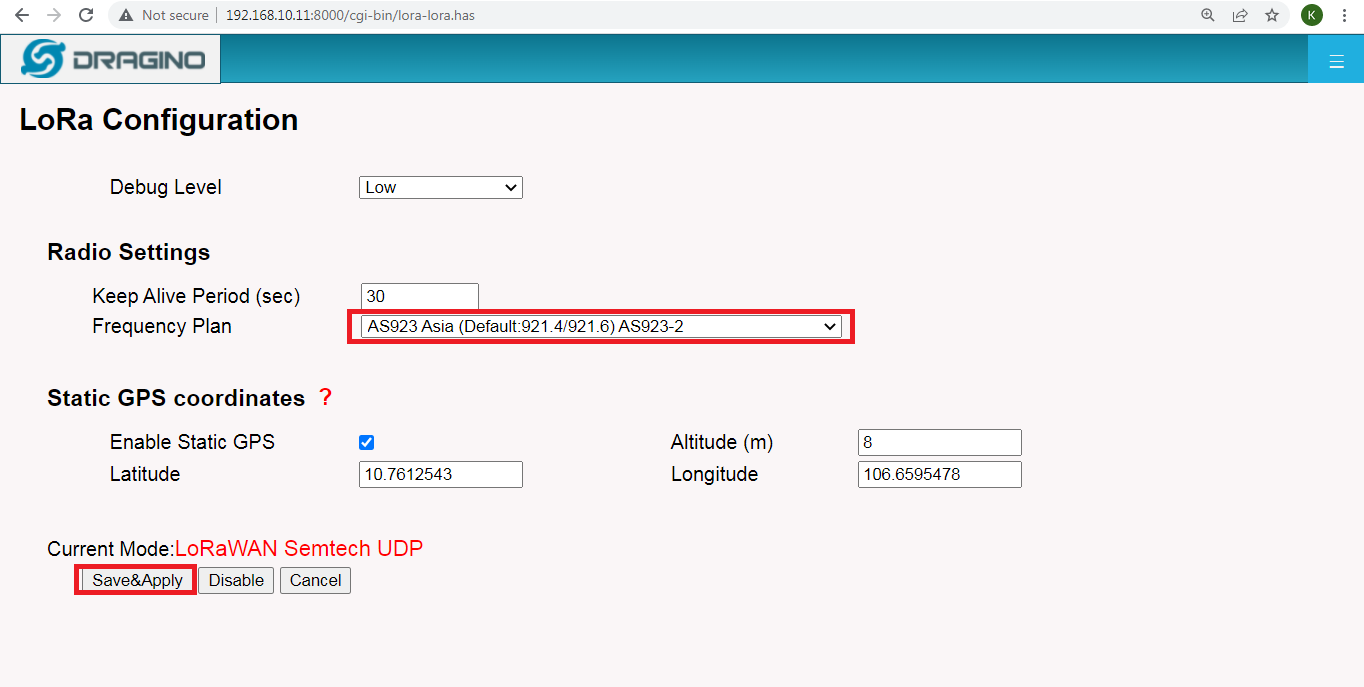
Step 3: Make sure your gateway is configured to the required LoRaWAN region.
- You can check Initial Setup for Gateways to set the LoRaWAN region for your gateway.
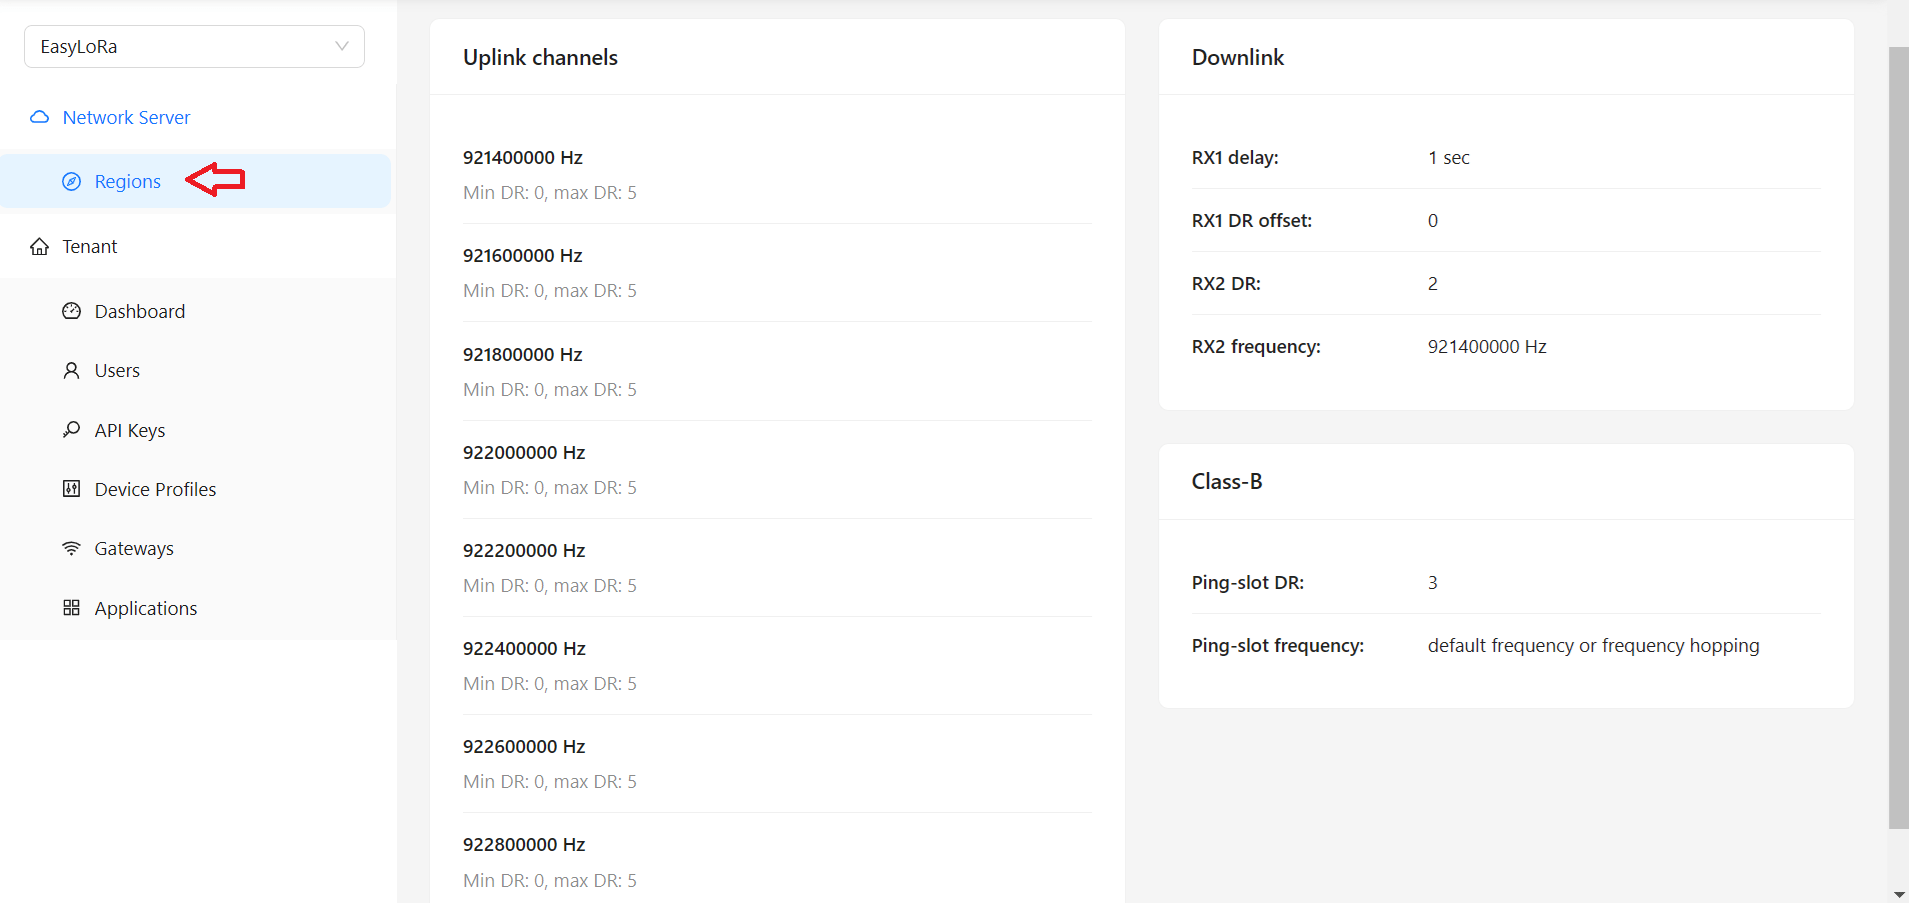
Step 4: Make sure the frequencies are the same between the gateway and the server
The below image shows the frequencies the gateway is using.
- You can check Initial Setup for Gateways to see which frequencies the gateway is using.
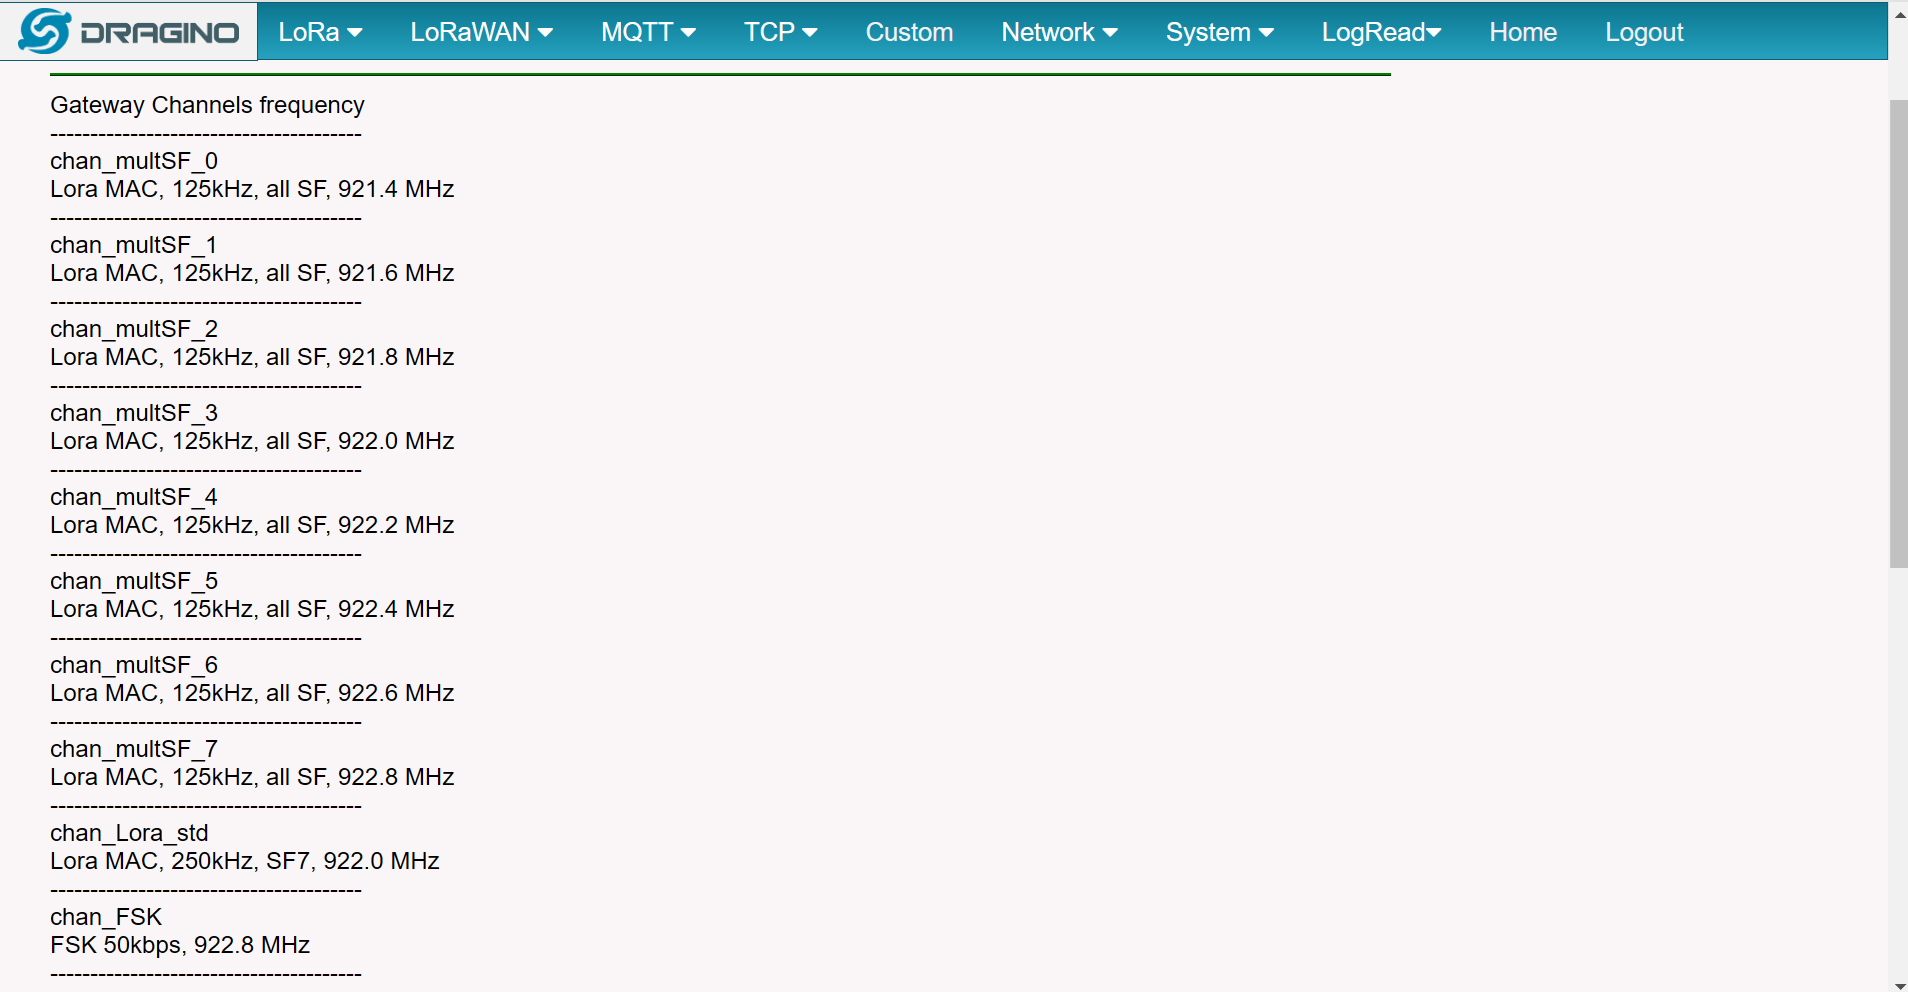
It must match the frequencies in the server.
Step 5: You must see your gateway “Online” at this step within 1 minute.
- You do not need to add any LoRaWAN nodes to see the gateway “Online”.
- The gateway can be seen “Online” without any LoRaWAN nodes.
2. Check LoRaWAN Nodes
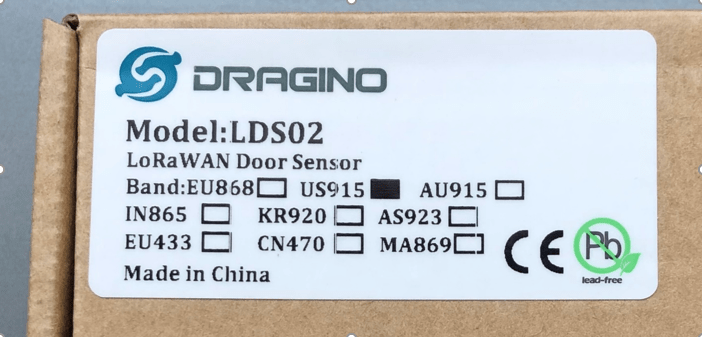
Step 1: Make sure your LoRaWAN node uses the correct LoRaWAN region.
- You need to check on the device box to see if there is EU868, US915, AS923…
- You may need to access to the console of the node via UART connection or BLE connection to see the region information.
- Please note US915, AU915, AS923 and CN470 have subbands. So you need to know which subbands/sub-region the node is using. E.g: US915_1, AU915_1, AS923_1, AS923_2…
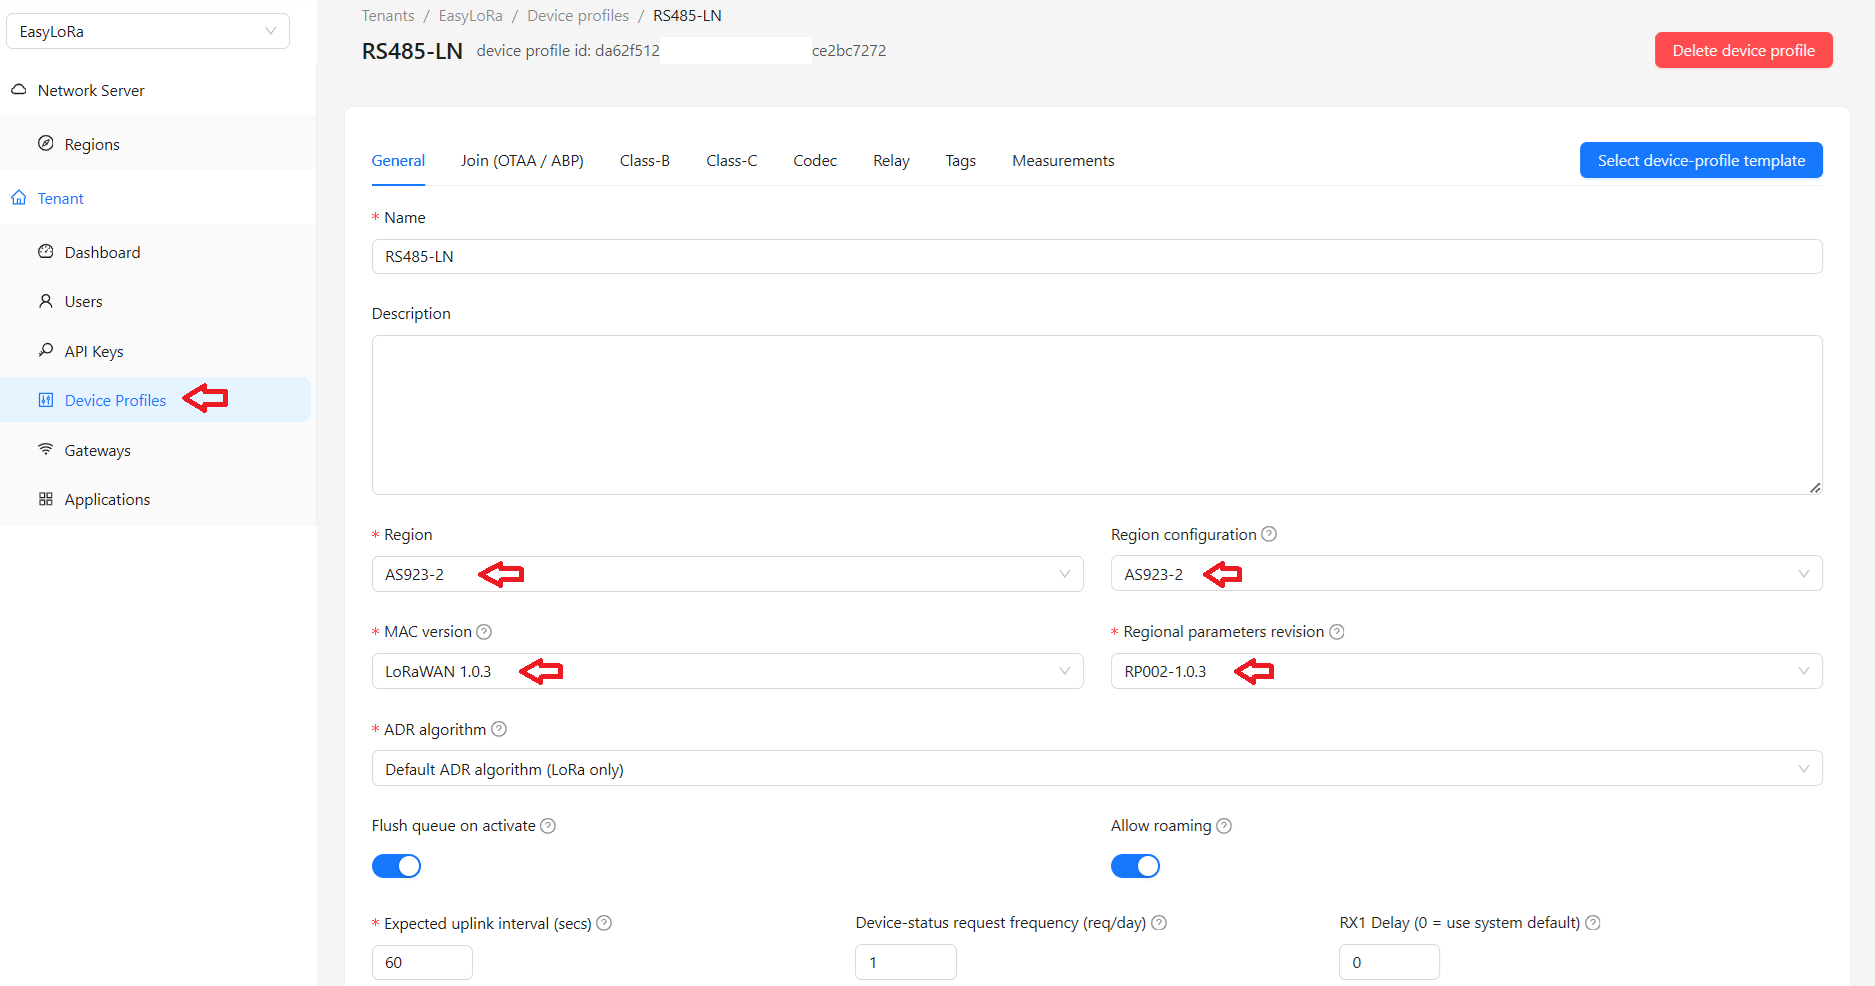
Step 2: To check the Device Profile of the node
- To make sure the Region and Region configuration are matched with the setting in the gateway and server
- MAC version is usually 1.0.3 for most of the commercial LoRaWAN nodes. For DIY node with Radiolib library, the MAC version is 1.1.0.
- Regional parameter revision is RP002-1.0.3 for most of the commercial LoRaWAN nodes.
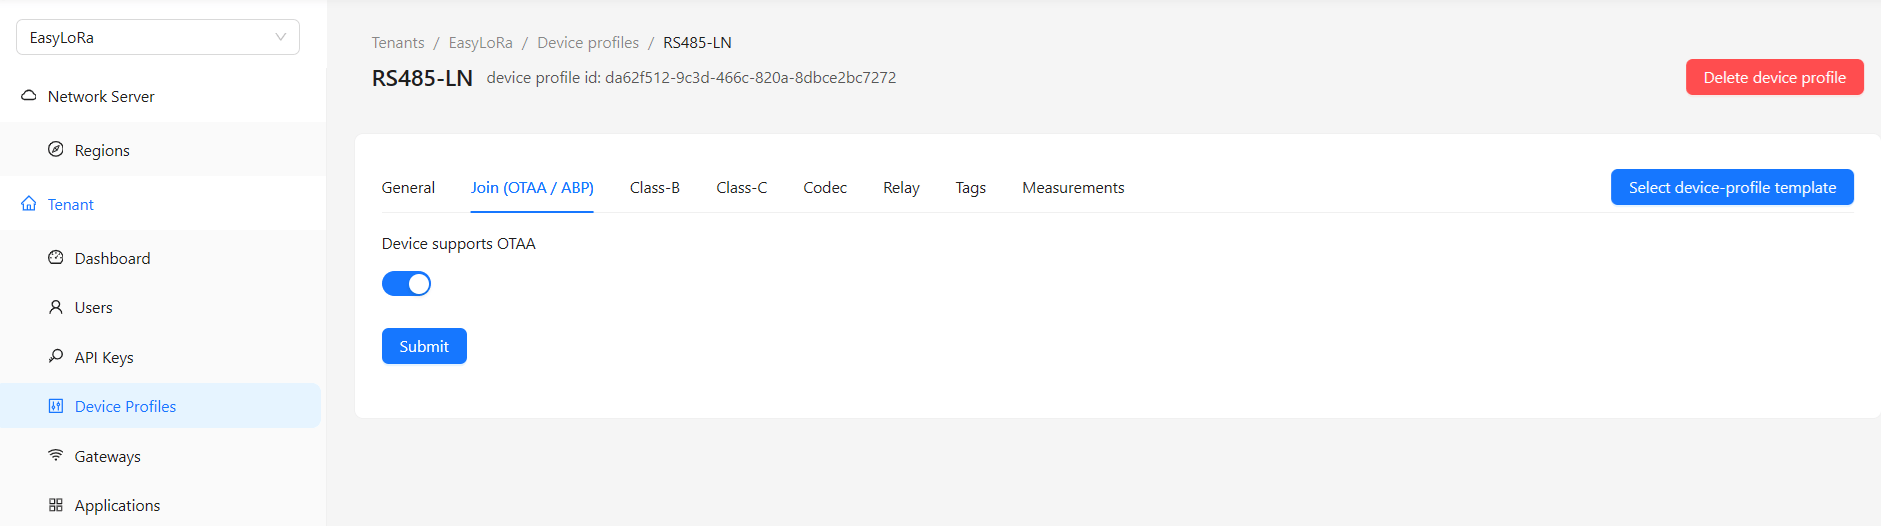
Step 3: Make sure OTAA is enabled.
- Most of the commercial LoRaWAN nodes use OTAA.
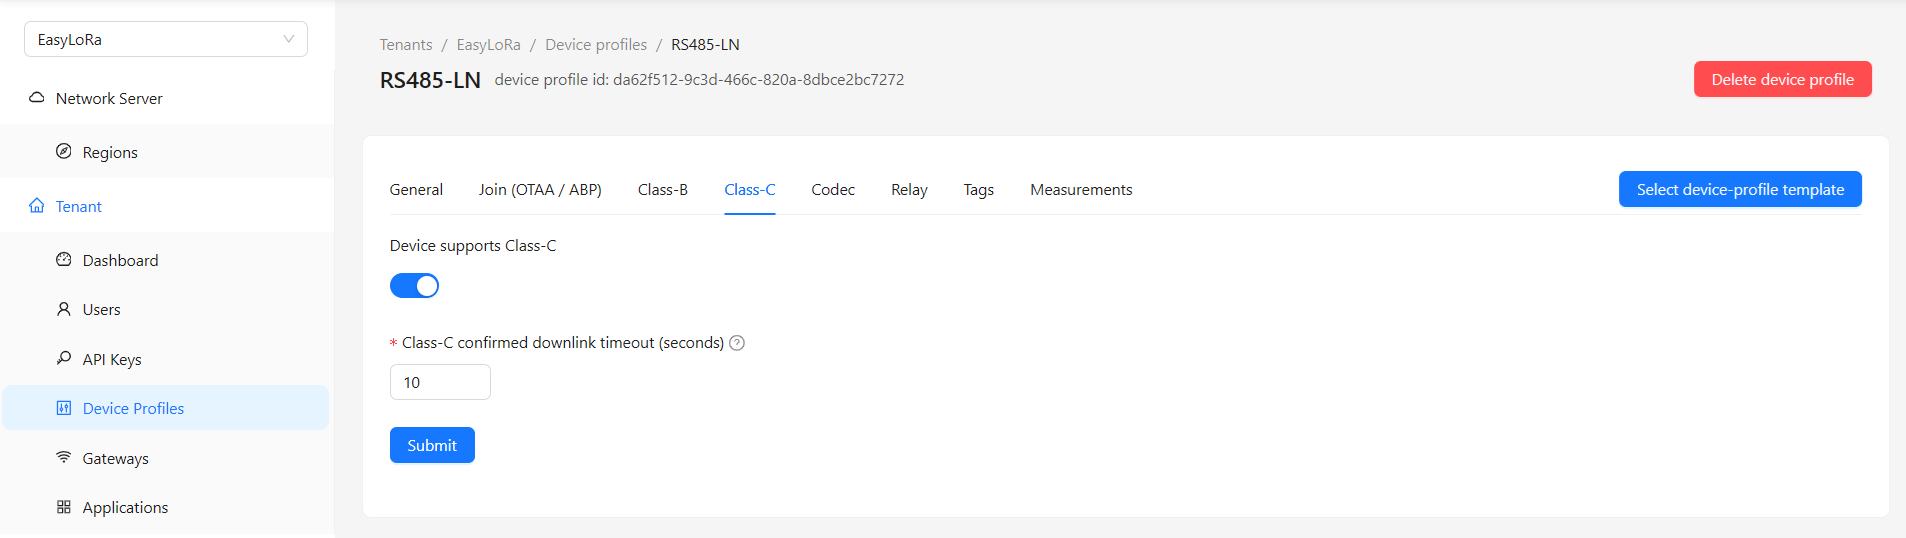
Step 4: To check the Class-C
- Most of LoRaWAN nodes with battery uses Class A only. Do not enable the Class C for these nodes.
- Some nodes with main power support Class C. To enable Class C for these nodes.
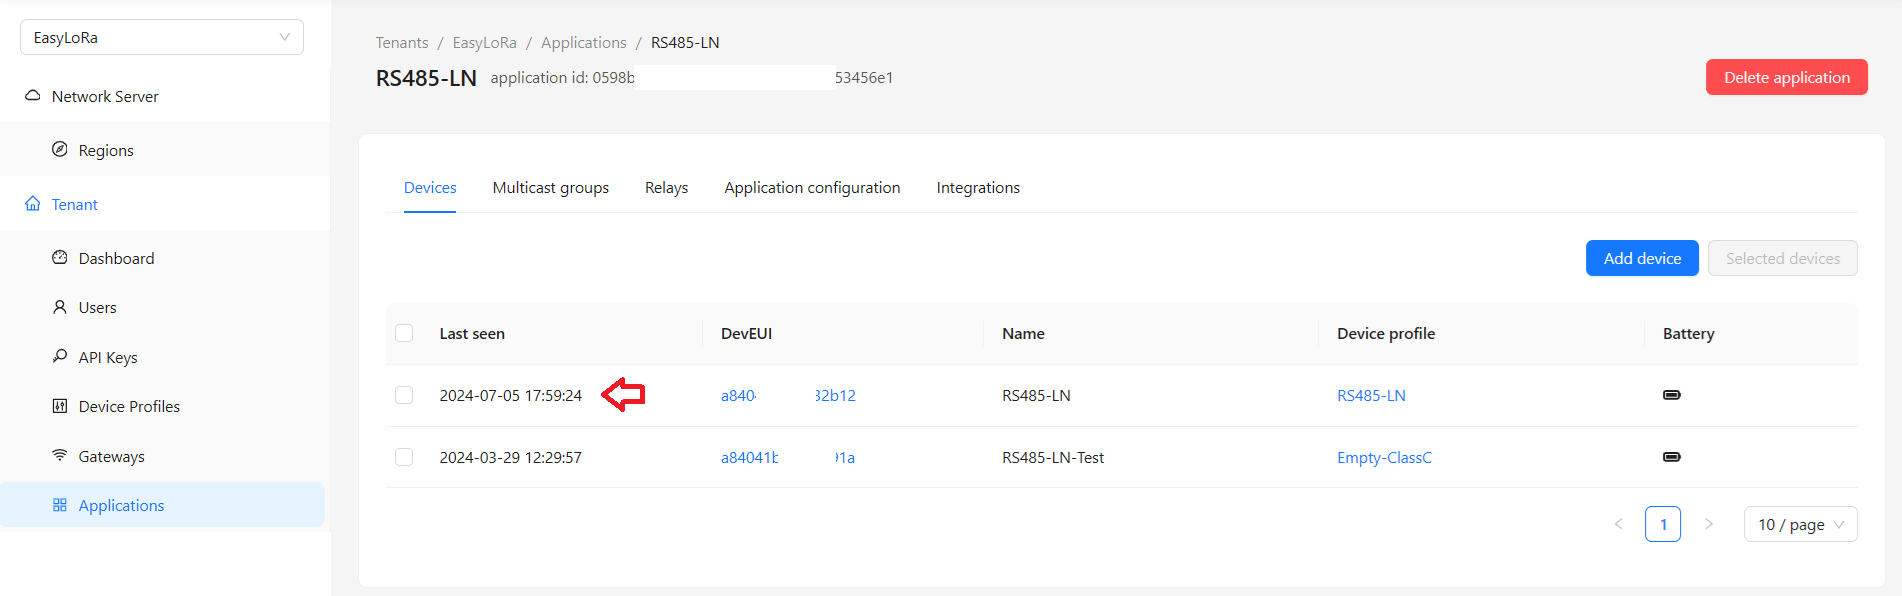
Step 5: To check if “Last seen” is updated.
3. Check LoRaWAN Communication
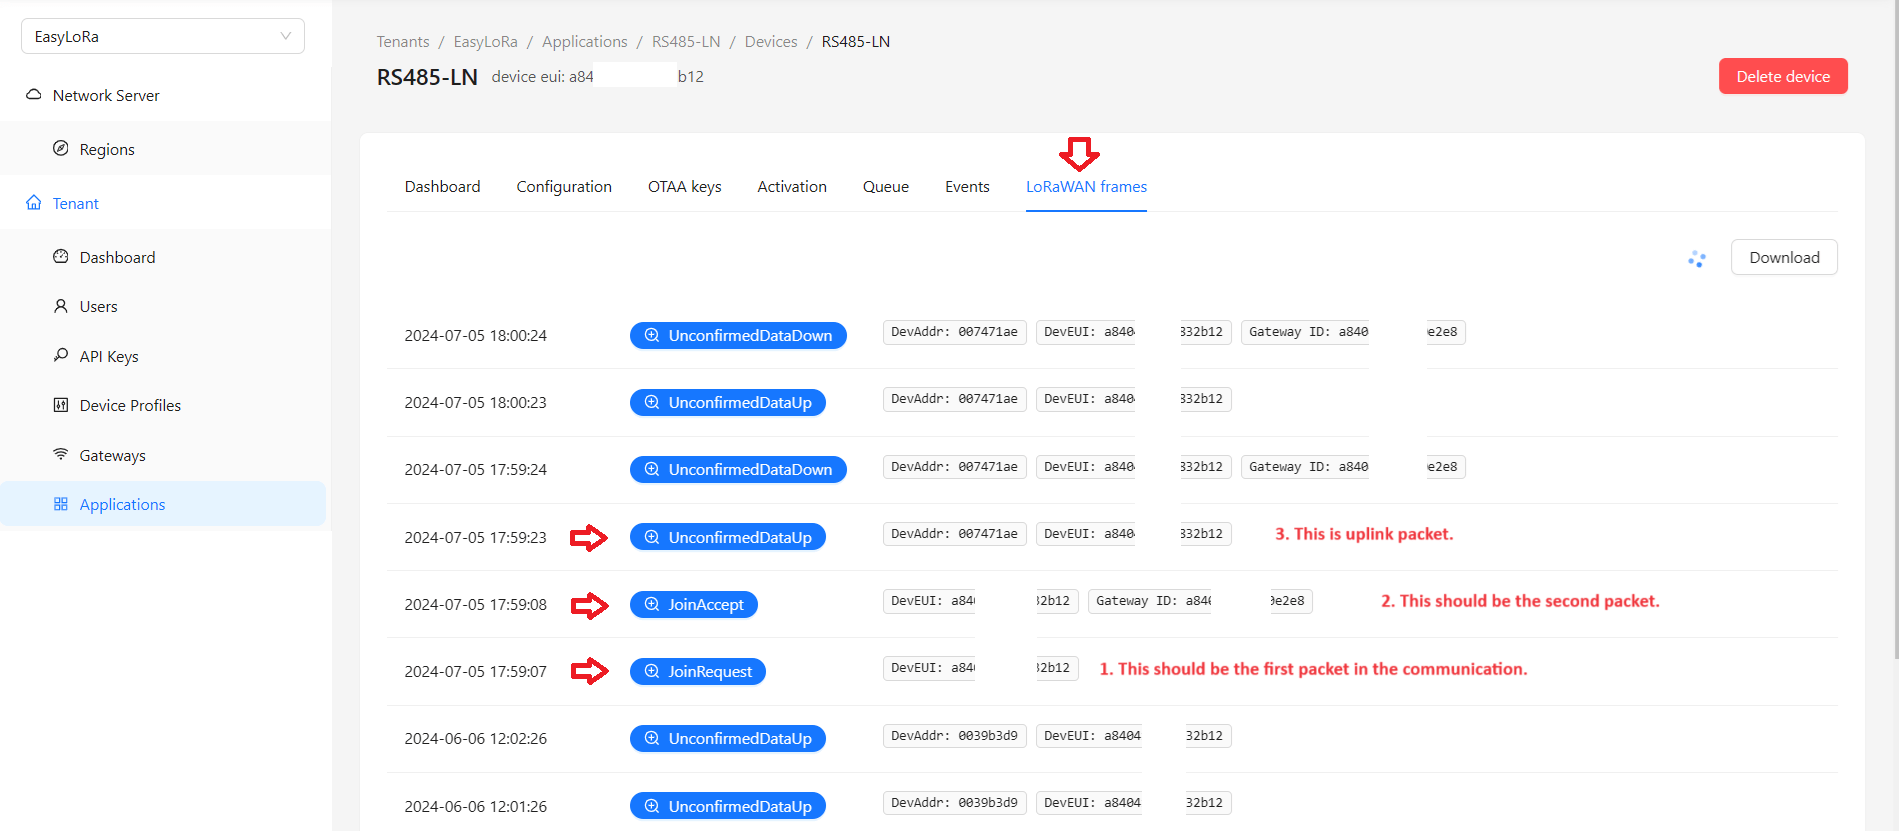
This is a working LoRaWAN communication.
- Join Request: This is the first packet in the communication.
- Join Accept: This is the second packet in the communication.
- Unconfirmed Data Up: Most of the time, the uplink packets are unconfirmed. The fport will be larger than 0.
Finding 1: If you do not see any packets in the server
- Check the power of the node and gateway
- Check if your gateway can reach the server via Internet
- Check in the gateway GUI if the gatewan can receive any packets from the node. If not, likely the gateway and node do not use the same LoRaWAN region.
Finding 2: If you do not see the Join Request
- The region settings for LoRaWAN nodes, gateway and servers are likely not matched.
- The gateway is not able to receive packets from the node due to range or wrong region settings.
Finding 3: If you do not see any Join Accept
- To key in the correct the OTAA/App key. Check step 3.1-3.3 in this guide.
Finding 4: If you see there is MIC errors
- To key in the correct the OTAA/App key. Check step 3.1-3.3 in this guide.
Finding 5: If you can not see any Unconfirmed/Confirmed Data Up with fport >0
- Join Request and Join Accept are not received yet.
- The LoRaWAN region of the node, gateway and server are not matched.
- The node does not send anything to gateway. To check the period to send uplink packets in the node. Some nodes are set to send uplinks every 20 minutes or 1 hour by defaut.
Finding 6: If you can see Join Request and Join Accept but there is no Uplink.
- You need to check if your gateway is set to “Public” mode? Private gateway will not forward Uplinks from your nodes.
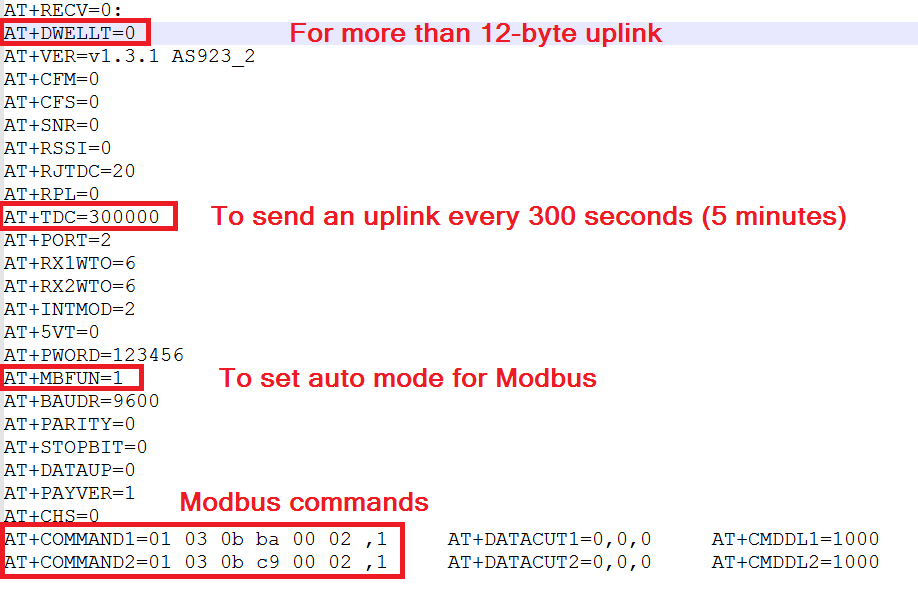
Finding 7: If you are using region AS923, AS923_2, AS923_3 and AS923_4 and you can not receive packets with more than 12 bytes.
- You need to disable DWELLT to allow long packets.
This is the console of Dragino RS485-LN via UART console. Other nodes will have similar methods to see the configuration.
- We can see the region is AS923_2
- The sending frequency is 300 seconds.
If you still can not find the issue, you are welcome to subsribe our Cloud and Chat with us for support.
Need help for your projects?
Please chat with us on the red chatbox to get help or discuss about your projects.
Thanks for reaching us.


Hi,
I can see Join Request and Join Accept but there is no Uplink.
What is the issue?
You need to check if your gateway is set to “Public” mode? Private gateway will not forward Uplinks from your nodes.
You saved my days.
Thanks a lot.
Hi,
I will have some problems with my RAK gateway and Dragino nodes.
Could you help me to debug them?
Hi Frank,
You can subcribe to our Easy LoRaWAN Cloud and we will support you to troubleshoot and on board your gateways and nodes.
https://iotthinks.com/easylorawan-cloud/
Ok, great.